Best Milk for Latte Art: What Actually Works at Home?
Affiliate Disclosure: As an Amazon Associate, I earn from qualifying purchases. This post may also contain other affiliate links, meaning I may earn a small commission if you buy through them, at no extra cost to you. Your support helps keep this site running and allows me to continue sharing great content. Thank you!
Latte art is one of those coffee skills that looks magical until you try it yourself. One wobbly swirl later, and you’re staring into a cup of confused microfoam. Sound familiar? Here’s the thing: it might not be your technique. It might be your milk.
In this beginner-friendly guide, we’re breaking down the best milk for latte art at home. Whether you’re a dairy devotee or all about plant-based pours, we’ll help you find your foamy soulmate.
Why Milk Type Matters for Latte Art
Milk isn’t just filler, it’s your canvas. And just like you wouldn’t paint on wet cardboard, you don’t want to pour latte art onto sad, bubbly foam.
The right milk creates microfoam that’s smooth, shiny, and pourable. To get there, three things matter:
- Fat Content – Adds creaminess and helps with silky texture.
- Protein – Supports foam stability and structure.
- Temperature – Too hot? You’ll scald it. Too cold? You’ll get dishwater.
The sweet spot? Steam your milk to around 140°F (60°C). That’s the magic zone for creating microfoam that’s structured but not stiff, shiny but not bubbly.
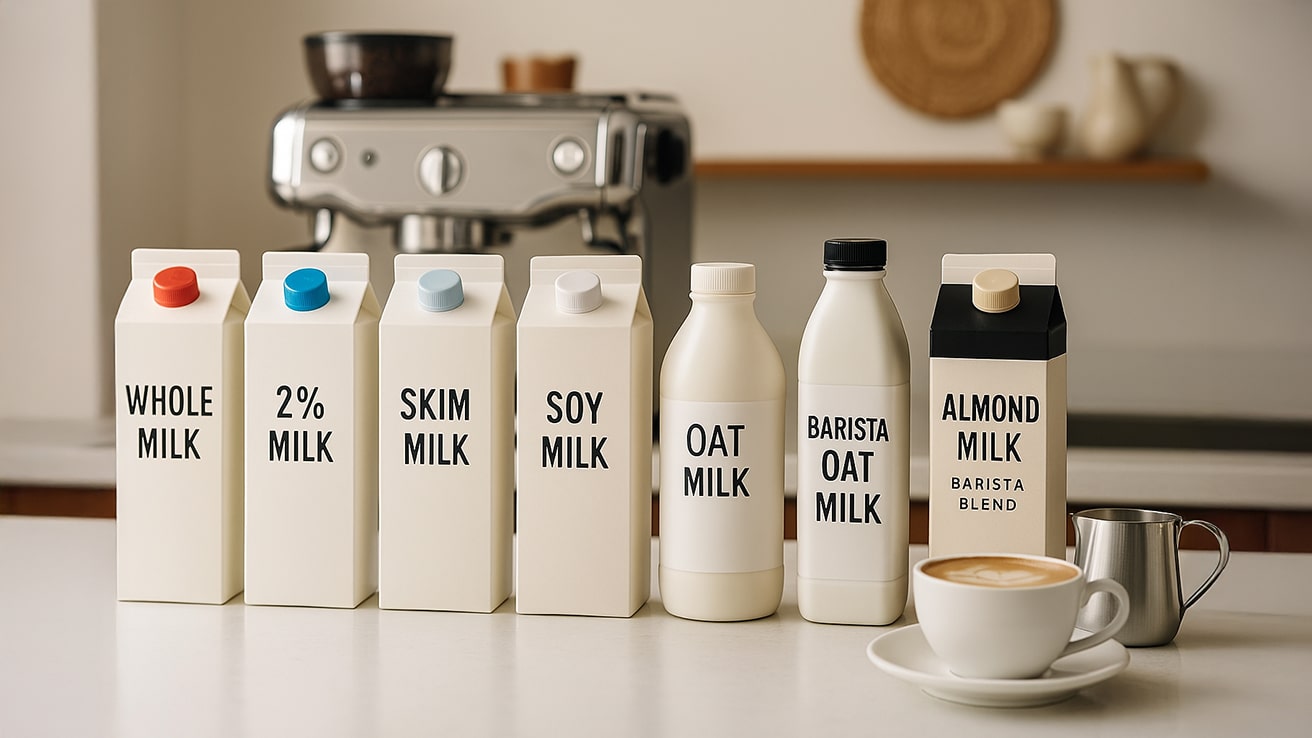
Best Cow’s Milk Options for Latte Art
Cow’s milk is the OG for latte art, and for good reason. Its balance of fat and protein makes it the most forgiving option for beginners.
- Whole Milk: This is your go-to. With its full-fat content, it consistently delivers that creamy microfoam that’s easy to work with. Think thick, glossy texture that makes hearts and tulips a breeze.
- 2% or 1% Milk: Still usable, but the foam can get a little airy or break down more easily. You’ll need to work a bit harder on your steaming technique to get latte art-worthy texture.
- Skim Milk: This one’s tricky. It produces a ton of foam, but not the good kind. Expect large, loose bubbles and a less creamy feel.
- Quick Tips:
- Start with cold milk straight from the fridge. It gives you more time to work the steam before it overheats.
- Use a thermometer if you’re still learning. Aim for that 140°F sweet spot.
- Try to steam fresh milk whenever possible. It holds structure better than milk that’s been sitting open for a few days.

Can You Use Non-Dairy Milk for Latte Art?
You bet, but not all alt milks are up for the task. Their protein and fat profiles vary wildly, and that affects foam quality.
Best Plant-Based Picks:
- Barista Oat Milk – Fan favorite for a reason. It steams like a dream, has a neutral flavor, and delivers reliable microfoam. Look for barista blends from Oatly, Minor Figures, or Califia.
- Soy Milk – High in protein, which is great for foam stability. Just watch for curdling; it sometimes clashes with acidic espresso. Brands like Pacific Barista or Silk Barista tend to hold up better.
- Almond Milk – Naturally thin, but barista versions are game-changers. Try Califia or Elmhurst barista blends.
Avoid: Coconut milk, rice milk, or generic store-brand alt milks unless they’re labeled “barista.” They’re often too thin or unstable.
Want a better pour with alt milks? Check out these latte art tools you’ll actually use to give your plant-based foam the best shot.
- Pro Tips for Alt Milk Success:
- Always shake the carton before use. Separation is real.
- Steam a little cooler, 135°F to 140°F tends to work better for plant milks.
- Experiment with brands. Even within the same milk type, some are far more foam-friendly than others.
What Makes “Barista Series” Milk Special?
It’s not just a marketing gimmick; these milks are engineered for foam.
Barista series milks (both dairy and plant-based) are fortified with just the right balance of fat, protein, and emulsifiers to create silky, stable microfoam. They’re designed to:
- Steam easily with fewer bubbles
- Pour more consistently
- Hold the shape longer in your cup
Whether you’re pouring a leaf, a heart, or your first blob, barista blends make the process way easier.
Bonus Tip: If you’re new to this, try a barista-style milk side-by-side with a regular one. You’ll feel the difference in the pitcher before you even start pouring.
Milk Storage & Steaming Tips for Beginners
Even the best milk won’t save you if your steaming game is off. Here’s how to keep your milk ready and your foam silky:
- Start with cold milk. Always. It gives you more time before it overheats.
- Never re-steam milk. Once it’s been heated, it’s done.
- Use a thermometer if you’re new. Overheated milk tastes flat and won’t foam.
- Clean your steaming wand after every use. Old milk = weird foam.
Want to go the extra mile? Try these beginner-friendly techniques:
- Whole milk: Steam for about 25 seconds, listening for a soft hiss, not a screech.
- Oat milk: Shorter time (around 18 seconds) to avoid overheating.
- Almond milk: Use the “quiet zone” technique, gentle steaming to reduce large bubbles.
- Soy milk: Try swirling the pitcher after steaming for denser foam.
Final Thoughts
Choosing the right milk is the not-so-secret ingredient to beautiful, pourable latte art. Whole milk is the easiest jumping-off point for beginners. If you’re going plant-based, barista-style oat milk is your best bet.
But here’s the truth: the best milk for latte art is the one that makes you want to try again tomorrow. Don’t stress about perfection, just have fun, steam smart, and keep pouring.
If this guide helped you, pin it to your latte art board for later! And let me know in the comments what milk you are using right now and how it’s working out.

Sonia Zannoni
I help coffee lovers experience the rich stories, origins, and luxury of high-end coffee. At Aroma Expeditions, I share my passion for sustainable sourcing, ethical beans, and the art behind every pour.
Let’s turn your daily brew into an adventure worth savoring.

I actually learned how to froth milk at home without a steam wand thanks to your website—super helpful! So seeing this post on the best milk for latte art really caught my eye. I’m using Oatly and absolutely love it, but I’ve always wondered… can decent latte art really be done without a steam wand, or is that just wishful thinking?
Either way, I’m loving these beginner-friendly tips. They make the whole process feel a lot more doable!
It absolutely isn’t wishful thinking—decent latte art can be done without a steam wand, and you’re proof it’s possible if you’re already frothing with Oatly and loving the results!
While steam wands definitely offer more control and heat consistency, tools like a French press, handheld frother, or even a whisk can still produce microfoam good enough for hearts, blobs (we’ve all been there), and even the occasional tulip with practice. The key is getting milk that’s both smooth and pourable—not too stiff or bubbly.
If you haven’t revisited it recently, this guide also walks through a few frothing methods that work well for non-dairy milk: How to Froth Milk at Home.
And if you’re ever troubleshooting your pours, I’ve also got a post on common latte art mistakes, including a section on pour height that might come in handy!
Out of curiosity, what frothing tool are you using now? It’s always fun to hear what’s working well for fellow home baristas.
This guide was incredibly helpful! I always thought any milk would work for latte art, but your breakdown of how fat and protein content affect microfoam quality really opened my eyes. I also appreciate the specific recommendations for both dairy and plant-based options.
Quick question: Have you noticed any differences in performance between various brands of oat milk when it comes to steaming and pouring? Thanks for sharing these insights!
You’re absolutely right—milk choice makes a much bigger difference than most people expect, especially when it comes to getting that smooth, stable microfoam for pouring. I’m glad the breakdown helped clarify the fat and protein role—it really is the secret sauce behind latte art texture!
As for oat milk brands, yes, the performance definitely varies! Some steam up beautifully and hold their foam, while others split or collapse before you’ve even picked up your pitcher. In my experience:
• Oatly Barista Edition is the gold standard—it consistently froths well and has a creamy texture that pours nicely.
• Califia Farms Barista Blend also performs solidly, though it’s slightly thinner and can be more sensitive to temperature.
• Minor Figures Barista Oat is another great option with a neutral flavor and decent stability.
• Regular (non-barista) oat milks tend to struggle—they often lack enough protein to hold a decent foam.
If you’re experimenting with frothing at home, you might also enjoy this guide: How to Froth Milk at Home (Without a Steam Wand). It walks through tools and techniques that work well with both dairy and plant-based milk—especially if you’re skipping the espresso machine!
Out of curiosity, have you found a favorite oat milk that works with your setup? Always love hearing what’s working for other home baristas.